Wednesday, June 20, 2012

Favorite Foods of Hawaii

During the plantation era workers in Hawaii sat together at lunch and ate a bite of whatever their co-workers brought. It might have been adobo, fried rice or teriyaki. Call it potluck, Hawaii style. Trying new flavors has long been part of Hawaii's heritage and something you should do too when you visit. Trying local specialties and discovering new (and old under-the-radar) places in Hawaii is one of my favorite vacation activities.

Everyone has their 'must try' things to eat in Hawaii. Here are just a few of mine and where to find them on Oahu. Each one of these dishes tells you a little something about the culinary history of Hawaii.

poke title=
Poke (pronouned po-kay)
Where to find:
Everywhere, but Alicia's Market has a big selection

This is perhaps one of the most 'authentic' dishes from Hawaii. It's primarily raw fish and it comes in many varieties such as wasabi, tobiko, and Maui onion, but traditionally it was just chunks of fish such as ahi, salt, seaweed and a bit of toasted kukui nut, all native ingredients.

manapua title=
Manapua
Where to find:
Royal Kitchen in Chinatown

These filled buns look like cha siu bao, but the version you find in Hawaii is larger and a little sweeter and much lighter. The dough seems a bit more Portuguese than traditional Chinese. You can also get it filled with Kalua pork which you definitely won't find outside of Hawaii.

pork hash
While at Royal Kitchen don't miss the 'pork hash' Hawaii's version of siu mai. It's unique and succulent with less ingredients than siu mai, but it's very tasty all the same. Both the manapua and the pork hash are very inexpensive.

taro chips
Taro Chips
Where to find:
Everywhere but for freshly made chips go the Hawaiian Chip Factory Outlet

You may or may not appreciate poi, but you are sure to enjoy taro chips. The Hawaiian Chip Company opened in 1999 and makes very popular vegetable chips served at restaurants, on Hawaiian Airlines and they are widely available in stores. But at the factory shop you can get a freshly made hot bag of chips and season them yourself. You can also get a snack, like the killer sliders they serve on Saturdays.

malasadas title=
Malasadas
Where to find:
Leonard's Bakery

These Portuguese donuts are a must. The big neon sign at Leonard's letting you know when they are fresh will lure you in. I don't know anyone who doesn't love these hot, yeasty, moist-in-the-middle pillows of love, better than any Krispy Kreme, that's for sure.

shave ice
Shave Ice
Where to find:
Many places, but I like Tats the best

Better than a snow cone, more like a snowball, the best shaved ice is super fluffy. Shave ice first appeared as a cooling treat on the plantations, and was brought to Hawaii by the Japanese. Get it flavored with something tropical like lilikoi. It's sweet and cooling which is the perfect combination when temperatures rise. Favorite spots are widely debated. It's often said the older the shave ice machine, the better the shave ice.

My thanks to the Hawaii Visitors & Convention Bureau and especially local girl and Oahu writer Catherine Toth for introducing me to some (but not all) of the items featured here

Brussels Sprouts and Miso Dressing Recipe


Add to my list of New Year's resolutions, use more condiments and ingredients lurking in the fridge. My refrigerator is packed with Chinese sauces, jams and jellies, and various sauces and mustards. Sometimes I barely have room for anything else! So I am trying to use the things I probably used once and then forgot about.

First up, miso. I love the salty savory rich flavor of miso, which is a fermented soy bean paste that is like pure umami. You've probably had miso in soup at a Japanese restaurant. I especially like white or shiro miso which also has some sweet buttery notes. I've used it in soup and salad dressings and found that it complements many vegetables. In David Chang's cookbook Momofuku Cooking at Home is a recipe for miso butter sauce which is more like paste, that he was inspired to make after eating miso butter ramen in Japan. He adds a touch of sherry vinegar. In my recipe I make an olive oil based dressing with a touch of buttery white miso. The finished dish tastes much richer than it is.

If you are looking for more ways to use miso, this dressing is a good start. Try using it on other vegetables; I think it would be particularly good on spinach, kale, carrots or cauliflower. You could also use it on salad. Let me know if you have any other tips for using miso!

Roasted Brussels Sprouts with Creamy Miso Dressing

Serves 4

1 pound brussels sprouts
1 Tablespoon extra virgin olive oil
1/4 teaspoon kosher salt

2 Tablespoons white miso
2 Tablespoons extra virgin olive oil
1 Tablespoon water
3/4 teaspoon Dijon mustard
1/2 teaspoon lemon juice

Preheat oven to 400 degrees F.

Make dressing by whisking together the miso, olive oil, water, mustard and lemon juice. Taste for seasonings and adjust as you like. The dressing can be kept in the refrigerator for several days, just bring to room temperature and whisk again before serving.

Trim the stem ends of the Brussels sprouts, cut each in half lengthwise, then toss them in a bowl with the olive oil and salt until they are well coated. Transfer sprouts to a roasting pan or rimmed sheet pan (line with tin foil for easier cleaning) and roast for 30 minutes, stirring once or twice so they cook evenly. Brussels sprouts should be beginning to brown on the outside and tender on the inside. Place the sprouts in a serving bowl or platter and drizzle with the dressing.

Enjoy!

Tuesday, June 19, 2012

Handlng honey and molasses when measuring?

Working on recipes that involve honey and measuring cup takes a long time for the sweet liquid to leave the cup. Try spraying a non-stick cooking spray to the measuring cup before filling it. Pouring the honey would be much easier since the oil from the spray makes the sticky honey slip right out of the cup. 

Similar Posts:   


Save and share Handlng honey and molasses when measuring?

 Want to share this tip with your family and friends? Click the button below to send them an email or save this to your favorite social network.


Stuffed Bread with Sausage and vegetables recipe

Photo: Stuffed Bread with Sausage and vegetables recipe

The Arabic Food Recipes kitchen (The Home of Delicious Arabic Food Recipes) invites you to try Stuffed Bread with Sausage and vegetables Recipe. Enjoy the Arabic Cuisine and  learn how to make Stuffed Bread with Sausage and vegetables.  

Ingredients

For the dough

1 Tbs yeast
1 tsp sugar
1 ½ Cup Warm water
3 Cup Flour
1 tsp salt
1 Tbs oil

For filling
½ Kilo beef sausage
1 Onion, sliced
1 Cup bell pepper (green, yellow, and red), sliced
Salt and pepper
1 Cup mozzarella cheese, grated
Oats for decoration

Method


 - Dissolve yeast and sugar in warm water, leave for 10 minutes or until foamy.
- Combine flour and salt in an electric mixer on low speed.
- Add oil and yeast mixture while constantly mixing for 5 minutes or until soft dough is formed.
- Shape the dough into a ball, place in a greased bowl, cover and let rise for 45 minutes.
- For filling, fry sausage in a skillet over a medium heat, add onion and pepper and stir for 5 minutes, season with salt, pepper, set aside to cool.
- Divide dough into equal parts; roll on a lightly floured surface and cut into rectangles.
- Fill sausage on one side of the edges, top with mozzarella then roll dough into cylinder
(Seal sides of the dough while rolling). Repeat with remaining quantity.
- Place in a baking tray (sealed side on bottom), spray with water then sprinkle oats.
- Cover and keep in a warm place to rise for another half an hour.
- Preheat oven to 180°C.
- Bake for 30 to 35 minutes according to bread size, cool and slice before Serving.

More Arabic Food Recipes: 

Toast stuffed with chicken
Cumin pancake with hummus
Red Pepper Hummus with Toasted Pita Triangles
Grilled Veggie Hummus Wrap
Middle Eastern Platter
Harissa lamb & houmous flatbreads 

Save and share Stuffed Bread with Sausage and vegetables recipe

Want to share this recipe with your family and friends? Click the button below to send them an email or save this to your favorite social network.


Sunday, June 17, 2012

Alaska Diary Day Two

Alaska!
What a difference a day makes! I've never been as happy to see the sun as I was on day two of my Alaskan adventure. If it had stayed grey, I would have missed on some truly spectacular scenery.

XTRATUF
Even on sunny days, it's not a bad idea to wear the de rigueur Alaska footwear, Xtratuf boots.

salmon processor
In Cordova there are just three processing facilities (plus a 4th very small one) where the salmon is cleaned, cut and prepared to be shipped out. In the Summer kids from places like Slovenia, the Czech Republic and the Ukraine come to live and do the work American kids don't want to do. Even the roe is harvested and graded and prepared for export. Sport fisherman can bring their freshly caught fish in to be smoked or canned.

moose
You know you're in Alaska when a garage has a seaplane and moose hanging in it.

moose
Speaking of planes, I thought we would heading straight into grey, but that wasn't the case at all.

Sheridan glacier
A flight is the best way to see the varied terrain including mountains, marshes, inlets and glaciers.

Sheridan glacier
Especially the breathtakingly beautiful Sheridan glacier where locals go ice skating in the Winter.

Copper River
The next moment wilderness.

waterways
And a close up look at the waterways.

Cordova
The harbor, our hotel and town, all visible at once.

wild cranberries
On route to the airport, foraging for delectable wild cranberries just means pulling off the road.

car trouble
A drive through a deeper-than-expected puddle led to a stall and subsequent rescue from some locals who quickly got under the hood. Literally.

I was already a fan of Copper River salmon before this trip, but my appreciation for the people and the way of life in Alaska increased exponentially over the course of 48 hours there. Alaska gets under your skin. But if you can't come for a visit, enjoy Copper River wild salmon and know you are supporting a sustainable fishery and way of life for a special community of Alaskans who live in harmony with nature.

A huge thanks to Copper River/Prince William Sound Marketing Association for hosting me in Cordova. Please see Alaska Day One if you missed it...


MORE!
Post from Missy Trainer about our foraging for wild cranberries.

Pecan and Pistachio Chocolate Chip Fingers


I almost always have cookies in my freezer for emergencies, but I had just gotten back from vacation and found out that I was the only one making dessert for a fundraiser celebration that I recently attended. I had frozen a cake beforemy trip, but didn't have time to make anything else, and my freezer was totally void of cookies. The party was at 7 and it was about 4 when I got this news. I wanted t make a simple dessert but didn't want to make brownies or chocolate chip cookies, both of which could have been done in the time allotted. Most of my cookies need chilling time, so I knew they were out, but I do have a lovely Heath bits cookie in my book, and I thought that would be perfect. The only problem was that I didn't have time to shop for Heath bits and didn't have them in my cupboard. What I did have in my freezer, however, was a small bag of left over baklava filling. I thought this might make a very interesting variation on my original recipe, and I wasn't disappointed. The cookies were crispy, buttery and had an unusual flavor due to the pistachios in the recipe.
2-1/2 sticks butter (10 ounces), room temperature
1 cup + 2 tablespoons sugar

2 large egg yolks, room temperature
3 cups (390 grams) unbleached all purpose flour, fluffed, scooped and leveled
1 teaspoon vanilla
1 cup mixed nuts, chopped finely by hand or in processor
1/2 cup mini-chocolate chips

1/2 teaspoon cinnamon

1/4 cup Ghirardelli Sweet Ground Chocolate and Cocoa, for dusting
OR
Decorating Glaze
1/4 cup (2 ounces) mini-chocolate chips
1 teaspoon oil
Preheat the oven to 350 degrees F. with shelves in the upper and lower thirds of the oven. Line 2 cookie sheets with parchment paper.

In a mixing bowl, beat the butter and sugar, just until blended. Beat in the vanilla and egg yolks, one at a time until well blended. Beat in the flour, a cup at a time (If you don't have a heavy-duty stand mixer, stir in the flour by hand.).  Stir together the nuts, choclate chips and cinnamon.  Stir this into the dough.

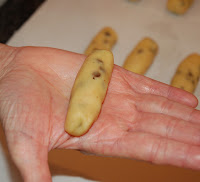
Shaping the cookies:
1. Use your hand to measure the ball size to about 1 inch.

2. Roll the ball in your palms in a circular motion to make it round and smooth.
3. Roll the ball into a log-shape by moving your hands back forth, parallel to each other.


4. Use your palm size to measure the length of the cookie to about 2-1/2-inches long. They will double in width, so go for a thinner, longer shape.
Transfer the cookies to the prepared cookie sheets, leaving about 2-inches between cookies.

Place the cookie sheets on the two shelves of the oven and bake for a total of 12-14 minutes, switching the pans from top to bottom, etc. after half of the cooking time.

Remove the cookie sheets and slide the parchment onto cooling racks to let the cookies cool for 5 minutes. Reduce the oven temperature to 275 degrees. When the temperature has come down, slide the parchment paper back on the cookie sheets and bake the cookies for another 10 minutes. Remove and cool, as above for about 5 minutes.

While the cookies are slightly warm, put the ground chocolate/cocoa into a strainer or sugar-shaker, and dust the tops of the cookies with the chocolate mixture.  Let the cookies cool completely before eating.

If you'd like to decorate them as shown in the opening photo, place the chocolate chips and oil in a small microwave-safe container. Micro-cook on medium power (5) for 1 minute. Stir until the chocolate is completely melted.

For this amount of glaze, you'll need a very small piping bag. You can make one out of a plastic storage or zip-top bag. Cut the bag in half, horizontally.
Put the bag into a small glass, and then fill the bag.


Hold the bag closed at the top, with the filled part resting in your palm, and your thumb and index finger holding the top (you can put a rubber band around the top if it is easier). Gently squeeze the filling toward the tip.


Make a very tiny cut in the tip with scissors. Pipe on the decoration.


These cookies keep for several days at room temperature, in a covered container. They may also be frozen in a covered container, with waxed paper between layers. This way you'll be able to defrost each cookie individually. They'll keep frozen for 3 months. Defrost them at room temperature, uncovered.