Tuesday, April 10, 2012
http://foodwishes.blogspot.com/
Watch, listen, learn, and enjoy! Hundreds of free, original video recipes, done by Chef John Mitzewich, the web's most popular cooking instructor.

Monday, April 9, 2012
Pea and Bean Stew

With the cooler weather coming in, it's great to have a hearty dish that can be whipped up in under 1/2 hour. A few weeks ago I was given a jar of Feisty Mama Medium Salsa. I had never tried the salsa before, because I don't eat raw onions and garlic, but the owner of Feisty Mama is a collegue of mine, and I use salsa sometimes to save time in cooking, so I was thrilled to receive a jar from her. Before I put anything in my cooking, though, I always taste it straight out of the jar. Let me say, that I was bowled over by the fresh taste of this jarred salsa, that tasted like someone had just made it. Kudos to you, Debra, for coming up with a recipe and technique to make this salsa so refreshing and fresh-tasting. If I ate salsa and chips, I would get on that website and order a case!

You can see from the label that the salsa is all natural, and fat free.
If you plan on cooking with salsa, you need to use at least the medium hot kind, and even the hot, if you want the spice to shine through when you are done cooking. I prefer, not spicy, so the medium worked fine for me.
In this 'chili' type stew, I used frozen baby peas, frozen baby lima beans and canned kidney beans. I loved this mix because the canned kidney beans are soft and velvety, while the lima beans are firm and a little grainy, and the peas, which were barely cooked, sort of pop in your mouth. The mix was terrific. To make the stew spicier, you can add more salsa, use the hot salsa, or you can add the salsa just before serving to preserve the spicy taste. These are all variations you can use to make the stew the way you like it, and after all, that's part of the point of cooking something yourself!

Here are all of my ingredients:
For 6 servings
2 jars of tomato sauce
1/2 cup Feisty Mama Medium Salsa
1 cup canned kidney beans, drained
1/2 - 1 cup of canned pumpkin ( in the baking aisle, but make sure it isn't filling that contains brown sugar, etc)
1 teaspoon ground cumin
1 teaspoon dried thyme
1/2 teaspoon ground cinnamon
1 cup frozen baby lima beans
1 cup frozen baby peas
1/4 raisins
water, as needed
In a medium saucepan, combine the tomato sauce, salsa, kidney beans, pumpkin (adding the larger amount makes it thicker and sweeter) and spices. Bring to a boil, cover, reduce heat and simmer for 15 minutes. Add the lima beans, cover and cook for 6 minutes. Add the baby peas and raisins, and cook for 3 minutes. Serve immediately, or refrigerate and serve within 5 days. If you want the stew to be thicker, you can always boil it uncovered until it is thick enough. If you want it thinner, add some water. The stew gets thicker as it sits, and up to 1/2 cup water may need to be added. It also gets milder as it sits, so take that into consideration. I like it best the day after I make it.
We like the stew served over brown rice, with cheese and sour cream, or in tortillas. I thin it a little for the rice variation, and leave it thick when using for tortillas.


Baby Shower Desserts Part 3 - Mini Cupcakes

To make royal icing booties, start with royal icing mix (from Michael's or a cake decorating store), or make your own using pasteurized egg whites.
Royal Icing
3 large pasteurized egg whites
3-3/4 cups sifted powdered sugar + 1/4 cup, divided
1/2 teaspoon cream of tartar
1/2 teaspoon flavoring of choice (vanilla, etc)
Reserve 1/4 cup sugar and mix together all other ingredients. Beat for 7-10 minutes until the icing holds a strong peak. Add more powdered sugar if necessary. Beat in color of choice ( I use a toothpick to add color so I have control and don't add too much). Keep the frosting covered with a damp cloth to keep it from drying out.
Prepare a pastry bag with a coupler and a #12 round tip (the coupler allows you to change tips without emptying the bag).

If you want to, you can mark a piece of partchment paper with rounds so that you have a bit of guidance in how big to make the bookies. Always mark on one side, turn the paper over and then pipe on the backside so that you don't contaminate the frosting with the marker. Hold the bag at a 45-degree angle and pipe from the toe towards the heel, releasing the pressure as you get to the heel.

For the heel you can either hold the bag straight up-and-down- or you can angle the bag slightly towards the toe and then pipe upwards. Dip a dowel in powdered sugar and then press into the top of the bootie. Don't worry about excess powdered sugar - when the booties are dry you can brush away the excess with a small paint brush (food-safe).

Switch to a #2 tip and pipe 'lace' at the top of the bootie (you'll have to experiment with this to see what looks good - I sort of made loops while raising the tip up). These booties are quite small, so it is hard to add a bow to the front. Instead, I made laces at the front of the bootie using the #2 tip. I used the same color, but you could do contrasting color if you like.

Don't put the booties on the cupcakes until just before serving, as the royal icing could get soft when exposed to the buttercream. These cupcakes are very small, so you might want to just use one on each (the opening photo has chocolate cupcakes with 2 booties and the vanilla with just one, for comparison).
For the Cupcakes
Before offering the recipes, I wanted to tell you about the new muffin pan that I just bought at Sur La Table. It makes 24 mini-muffins, but the best part is that the cups are shallower and wider than regular mini-muffin tins. The result is that the paper liners go in easier with no pleating and they come out of the pan much easier too.
 |
| Old style pan on left |
I'd never actually made vanilla cupcakes, always opting for chocolate, but I had a baby shower to do and the mom-to-be didn't like chocolate, so it provided a good opportunity for me to work on my vanilla baking. I started with my all around sheetcake recipe from my book, cutting it down to the appropriate size, but the results were not really what I wanted - they were too sweet, two vanilla tasting and the texture wasn't quite right for a piece of cake that gets eaten out of hand. Fortunately, the fix was easy and I didn't have to rebake them more than once. I simply cut down on the sugar and vanilla and added more milk.
Vanilla Cupcakes
187 grams all-purpose flour -- measured by fluffing, scooping and leveling
1 -1/2 teaspoons baking powder
1/4 teaspoon salt
5 ounces unsalted butter
1 cups sugar
1 -1 /2 teaspoon vanilla
2 large eggs
1 tablespoon oil
3/4 cup whole milk
Preheat the oven to 350 degrees F. with a rack in the lower third of the oven (use a hotter oven if you want cupcakes that crest higher). Place baking cups in each muffin space.
Whisk together the flour, baking powder and salt.
Place the butter and sugar into a large mixer bowl, and beat for a full 5-7 minutes until fluffy. Beat in the vanilla. Beat in the eggs, one at a time, beating for 30 seconds after each addition. Scrape down the bowl and then beat for a minute to blend everything. Beat in the oil.
By hand, stir in 1/3 of the flour mixture into the batter. Stir in 1/2 of the milk. Repeat until all of the flour and milk has been added. The batter will be very thick, as you'll see in the photo.

Spoon a heaping teaspoonful of batter into each mini-cup or a heaping tablespoon full into each full-size muffin cup. The cups should be about 3/4 full.
Bake for 8-12 minutes for minis (6-8 if using a hotter oven), 15-18 for full size cupcakes - until a tester inserted into the middle of the cake comes out absolutely clean. Let the cupcakes cool for a few minutes and then take them out of the pan and set on a cooling rack until completely cool. Rinse the hot pan in warm water and then cool water. Repeat the process with the remaining batter.

You can see that the muffins didn't crest very much, despite the fact that the cups were well-filled. If you bake them in a hotter oven, they should crest more. Try 375 degrees - but just watch carefully that they don't overcook. Makes about 36 mini muffins. I didn't make larger muffins, but I'm guessing that it would bake 12-15 of the larger muffins.
Blackberry Buttercream
Blackberry Buttercream is more on the more purple side of pink, which worked for me, since the colors of the event were pink and purple. Blackberries are so much easier to sieve than raspberries, that I was thrilled that the color would work for this party. I opted to do my Easy Meringue Buttercream rather than Simple Buttercream (uses Marshallow Fluff instead of egg whites) because I wasn't sure if the simple version would handle all of the blackberry puree, but you might want to give it a try, since it is so much easier to make ( see Filled Chocolate Cupcakes Revised), and since this version had problems with the puree as well (details follow).
10-12 ounces frozen blackberries, defrosted as per below instructions
2-4 tablespoons cassis liqueur, optional
180 grams (6 large) pasteurized egg whites (I used Organic Valley egg whites - in a carton)
2 tablespoons water
1-1/2 cups superfine sugar (or you can buzz regular sugar in a coffee grinder)
4 sticks (21 ounces) unsalted butter
1/2 teaspoon vanilla
1/2 cup blackberry puree (see below)
1/2 cup powdered sugar
For the blackberry puree:
Defrost the frozen blackberries, retaining all of the juice. Boil the juice until it is reduced by half (you can add some cassis liqueur to this, before or after boiling, depending on whether you want to get rid of the alcohol or not). Run the blackberries through a food mill and add this puree to the reduced juice. Sieve the mixture through a medium strainer to get rid of all seeds (blackberry seeds are pretty large, so a medium strainer works). You should have about 1/2 cup blackberry puree. Do not add it to the buttercream until it is at room temperature.
For the buttercream:
Remove the butter from the refrigerator and cut it into tablespoon-size lumps so it can soften while you prepare the eggs.
Boil 2 inches of water in a pot into which your metal mixer bowl will fit. Place the egg whites into the clean, grease-free mixer bowl. Whisk in the water and sugar.

Place the bowl over the simmering water, and whisk –stir constantly until the mixture reaches 120-130 degrees, about 1-3 minutes (very warm to the touch, if you don't have a instant-read thermometer). The mixture will be very warm, and the sugar granules should have dissolved. Remove the bowl from over the water. If you see any un-dissolved sugar crystals in the bowl, wipe these off with a paper towel.
Beat the egg white mixture , increasing the speed to medium-high to high speed , as quickly as possible without having the egg whites splash out of the bowl. Beat until the mixture looks like thick shaving cream, and the egg whites and bowl are cool - about 20 minutes.
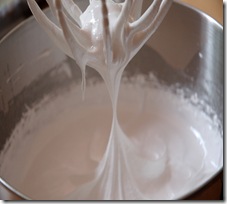
This is easiest done with a standing mixer using a balloon whisk. To hasten the process, wet a towel and place a few cupfuls of ice chips into it. Wrap it up and place this under the bowl so that it in constant contact with the bowl.
By now the butter should be at cool room temperature. If you press down on it with your thumb, it should yield readily, but should not be soft and melty. If too soft, refrigerate it just for a few minutes to firm it back up. Place the butter into a large mixing bowl, and beat until creamy. On low, beat in 1/3 of the whites. Repeat with the remaining whites, 2 more times. When all of the whites have been added, increase the beater speed to medium-high, and beat until the mixture curdles,

and then smoothes out into thick and creamy frosting, about 10-15 minutes.
![[wedding cake info 031[2].jpg]](https://blogger.googleusercontent.com/img/b/R29vZ2xl/AVvXsEiDanAkwslJJ4q3vLuBOT_LFC8tuLKYLEUCG_LJCY9XK6t68I7TTIFP-NDCxZGY3yOYSeQt51MsCYnJXJxOGV3FfuWhr9t-qiBH_taLMolNr0EgGK6ZjUNnmuR-RRXl5dxfBWNB6w68K6c/s320/wedding+cake+info+031%5B2%5D.jpg)
Beat in the blackberry puree, about 2 tablespoons at a time, beating after each addition until the buttercream is smooth again. Beat in the powdered sugar, 1/4 cup at a time. Adjust the flavor/sweetness by adding more cassis liqueur or more powdered sugar, to taste. Normally, buttercream can be frozen, but with this frosting, freezing created lots of problems.
For starters, I tried to beat it before it had come to room temperature (a definite no-no with all egg-based buttercreams). Here's what happened:

Now, this has happened before, and when I let the mixture come to room temperature it beat up nicely, but this time that didn't happen. In fact, as it got warmer, it got worse and worse:

Blackberry Buttercream is more on the more purple side of pink, which worked for me, since the colors of the event were pink and purple. Blackberries are so much easier to sieve than raspberries, that I was thrilled that the color would work for this party. I opted to do my Easy Meringue Buttercream rather than Simple Buttercream (uses Marshallow Fluff instead of egg whites) because I wasn't sure if the simple version would handle all of the blackberry puree, but you might want to give it a try, since it is so much easier to make ( see Filled Chocolate Cupcakes Revised), and since this version had problems with the puree as well (details follow).
10-12 ounces frozen blackberries, defrosted as per below instructions
2-4 tablespoons cassis liqueur, optional
180 grams (6 large) pasteurized egg whites (I used Organic Valley egg whites - in a carton)
2 tablespoons water
1-1/2 cups superfine sugar (or you can buzz regular sugar in a coffee grinder)
4 sticks (21 ounces) unsalted butter
1/2 teaspoon vanilla
1/2 cup blackberry puree (see below)
1/2 cup powdered sugar
For the blackberry puree:
Defrost the frozen blackberries, retaining all of the juice. Boil the juice until it is reduced by half (you can add some cassis liqueur to this, before or after boiling, depending on whether you want to get rid of the alcohol or not). Run the blackberries through a food mill and add this puree to the reduced juice. Sieve the mixture through a medium strainer to get rid of all seeds (blackberry seeds are pretty large, so a medium strainer works). You should have about 1/2 cup blackberry puree. Do not add it to the buttercream until it is at room temperature.
For the buttercream:
Remove the butter from the refrigerator and cut it into tablespoon-size lumps so it can soften while you prepare the eggs.
Boil 2 inches of water in a pot into which your metal mixer bowl will fit. Place the egg whites into the clean, grease-free mixer bowl. Whisk in the water and sugar.

Place the bowl over the simmering water, and whisk –stir constantly until the mixture reaches 120-130 degrees, about 1-3 minutes (very warm to the touch, if you don't have a instant-read thermometer). The mixture will be very warm, and the sugar granules should have dissolved. Remove the bowl from over the water. If you see any un-dissolved sugar crystals in the bowl, wipe these off with a paper towel.
Beat the egg white mixture , increasing the speed to medium-high to high speed , as quickly as possible without having the egg whites splash out of the bowl. Beat until the mixture looks like thick shaving cream, and the egg whites and bowl are cool - about 20 minutes.
This is easiest done with a standing mixer using a balloon whisk. To hasten the process, wet a towel and place a few cupfuls of ice chips into it. Wrap it up and place this under the bowl so that it in constant contact with the bowl.
By now the butter should be at cool room temperature. If you press down on it with your thumb, it should yield readily, but should not be soft and melty. If too soft, refrigerate it just for a few minutes to firm it back up. Place the butter into a large mixing bowl, and beat until creamy. On low, beat in 1/3 of the whites. Repeat with the remaining whites, 2 more times. When all of the whites have been added, increase the beater speed to medium-high, and beat until the mixture curdles,

and then smoothes out into thick and creamy frosting, about 10-15 minutes.
Beat in the blackberry puree, about 2 tablespoons at a time, beating after each addition until the buttercream is smooth again. Beat in the powdered sugar, 1/4 cup at a time. Adjust the flavor/sweetness by adding more cassis liqueur or more powdered sugar, to taste. Normally, buttercream can be frozen, but with this frosting, freezing created lots of problems.
For starters, I tried to beat it before it had come to room temperature (a definite no-no with all egg-based buttercreams). Here's what happened:

Now, this has happened before, and when I let the mixture come to room temperature it beat up nicely, but this time that didn't happen. In fact, as it got warmer, it got worse and worse:

It was the day before the shower and I had just spent 12 hours decorating cookies, so needless to say I was in no mood to remake the buttercream. I'm guessing this happened because of the large amount of liquid I had added to the buttercream (1/2 cup of blackberry puree plus some cassis liqueur). There was one last fix that had worked in the past. I softened 1 stick (4 ounces) unsalted butter to cool room temperature. I spooned the buttercream back into the mixer bowl and beat in 1/2 cup powdered sugar. With the mixer on medium speed, I added the butter 1 tablespoon at a time, and lo and behold! The buttercream re-formed.

The only thing left to do, is to pipe the buttercream onto the cupcakes. Refrigerate until 2-3 hours before serving , placing the booties on the cupcakes when you take them out of the refrigerator and the frosting has started to soften.


Wednesday, March 28, 2012
Peach Blackberry Cobbler Recipe

Is there a more old-fashioned word than cobbler or cobbled? It brings to mind a shoemaker in a Hans Christian Andersen fairy tale or those stone streets in Europe (the ones that are so treacherous if you're wearing high heels). Just the word alone is quaint, charming and feels handmade. Which of course brings me to the culinary version of cobbler. A cobbler is basically sweet biscuit dough formed into tiles and 'cobbled' together on top of baked fruit. It's the kind of thing you can make year round, just varying the fruit with the season. Because it's so chilly in San Francisco in August, it's really the perfect dessert at the moment. We'll have to a while longer before making ice cream I'm afraid.
My most recent cobbler combines organically grown peaches I got from my friend Gayle who annually adopts a tree from the writer and farmer Mas Masumoto, dark as night blackberries from Driscoll's and a spice I am crazy about, cardamom. I recommend combining a couple types of fruit, it makes the cobbler prettier thanks to the contrasting colors, but also adds more texture, complex flavor and sweetness. I also recommend adding a bit of spice. If black pepper and mint had a love child, it would be cardamom. It's an exotic and aromatic spice, common in both Indian cuisine and in Nordic baking. I added a touch of it to both the fruit and the biscuit topping but it's still very subtle.
This cobbler is based on a Sara Moulton recipe. She makes a scaled down version that bakes in a one quart pan in the toaster oven (I use an 8x8 inch pan instead). It's really smart for small households because cobbler is best fresh from the oven. In fact, if you preheat the toaster oven and then get cooking I find it reaches temperature just at the point the cobbler is ready to bake.
Note: You can blanch and peel the peaches if you like, but I prefer leaving the skins on.
Peach Blackberry Cobbler
Makes 4 servings
4 peaches, cut into 1/4 inch slices
1 1/2 cup blackberries
3 Tablespoons sugar
1 Tablespoon cornstarch
1/8 teaspoon cardamom
Topping
1/2 cup flour
1 1/2 teaspoons sugar
1/2 teaspoon baking powder
1/8 teaspoon baking soda
1/8 teaspoon salt
1/4 teaspoon ground cardamom
2 Tablespoons unsalted butter
1/4 cup buttermilk plus more for the tops of the biscuits
1 teaspoon turbinado sugar
Preheat oven to 375 degrees. Combine the peaches, blackberries, cornstarch, cardamom and sugar and toss gently to combine. Transfer to an 8 inch square baking pan.
In a bowl combine the flour sugar, baking powder, baking soda, salt and cardamom. Cut in the butter using a pastry blender until the mixture resembles the texture of small peas. Stir in the buttermilk to form a soft sticky dough. Knead into a ball then turn out onto a well-floured work surface and roll to a thickness of about 1/2 inch. Use a biscuit cutter or wine glass to cut out 4 biscuits gathering the trimmings and rolling again as necessary. Arrange the biscuits over the fruit. Brush biscuits lightly with additional buttermilk using a pastry brush, sprinkle with turbinado sugar, and bake for 25 minutes or until golden brown. Serve warm with or without vanilla ice cream.
Enjoy!
DO NOT REPRINT WITHOUT PERMISSION! ©2011 Cooking with Amy. All rights reserved. This material may NOT be published, rewritten or redistributed without permission. If you are reading this post somewhere other than Cooking with Amy, the Oyster Local blog or Gather.com, then the site where you found this post is illegally publishing copyrighted material.


(Not Really) Moroccan Chicken & Lentils Recipe

 This might be my favorite Hunger Challenge recipe. My apologies for it being brown on brown on brown, but trust me, it is delicious. On a bed of earthy and mildly spiced lemony lentils rests sweet roasted onions--some soft and some chewy--and tender roast chicken with crisp skin. It's is a combination of two different Bon Appetit recipes, but modified pretty significantly because I didn't have all the ingredients necessary. The technique for pan roasting the chicken thighs is a good one though I had to adjust it to keep the chicken from overcooking.
 Beans and legumes like lentils are a very economical way to stretch a budget and more expensive ingredients such as fresh vegetables and meat or cheese. My chicken thighs were over 6 ounces each, so one per person was plenty, but if you need more for bigger appetites by all means double the number of chicken thighs. I baked this dish in the toaster oven, you may need to cook it a little longer if you use a conventional oven. I'm not sure how Moroccan the original recipe is. My version is undoubtedly even less Moroccan which accounts for he admittedly goofy name.
A few other tips for saving money when it comes to cooking and shopping:
* Canned beans are more than dried beans. Cook things like chicken broth, beans and rice ahead of time and keep them in the refrigerator all week and use them as you need them.
* Look for vegetables that are in season and on sale. Compare the price to frozen vegetables especially for things like spinach and peas.
* Soups and stews like chili are easy ways to save, but you may get tired of eating soft food. Make some crunchy raw salads with carrots or beets to add variety.
* Scour the 'ethnic' food aisles for bargains. Sometimes spices and even staples like rice can be cheaper there.
* Cook double portions and you'll have something to eat on days when you don't have the time to cook.
* Buy in bulk. Instead of buying a jar of spices and bags of dried fruit and nuts, buy just a few teaspoons or tablespoons.
* Price out 'value packs.' The chicken I bought was only 99 cents a pound, but most packages were at least four pounds.
* Utilize ingredients that add flavor, texture and visual appeal to your meals, but don't cost a lot such as fresh cilantro, green onions and toasted bread crumbs.
Not Really Moroccan Chicken & Lentils
$2.09 for 2 servings (double the chicken for bigger appetites)
1/4 lb brown lentils .32
3 cups water
salt
2 chicken thighs, bone in 1.60
1/2 onion, sliced .20
2 Tablespoons olive oil .40
Juice of 1/2 lemon .17
1/2 teaspoon chile powder
1/4 teaspoon cinnamon .05
1 garlic clove, minced .05
Chopped cilantro to garnish .10 (optional)
Preheat toaster oven to 450 degrees. Combine water and 1/4 teaspoon salt in a saucepan over high heat. Add lentils; bring to boil. Cover, reduce heat and simmer until lentils are tender, about 20 minutes. Drain well; rinse with cool water and drain again. In a mixing bowl combine the olive oil, lemon juice, chile powder, cinnamon and garlic. Add the lentils and toss. Season with salt to taste. Make a bed of lentils on each plate that you will serve the chicken on.
Season chicken with salt, pepper. Heat a cast-iron skillet over high heat until hot. Place thighs in dry skillet, skin side down, and cook 2 minutes. Reduce heat to medium; continue cooking until fat renders and skin is golden brown, about 5 minutes. Flip and cook for another 5 minutes. Flip again so skin side is down and tuck sliced onions into the skillet, between the pieces of chicken. Transfer to the oven and cook 12 minutes. Check the skillet occasionally to make sure the onions are not burning and stir as necessary. Flip chicken so skin side is up; continue cooking until skin is crisp and meat is cooked through, about 5 minutes longer. Chicken is done when it reaches the internal temperature of 165 degrees. Remove from the oven. Place onions on the lentil salad and chicken on top of that. Garnish with chopped cilantro.
DO NOT REPRINT WITHOUT PERMISSION! ©2011 Cooking with Amy. All rights reserved. This material may NOT be published, rewritten or redistributed without permission. If you are reading this post somewhere other than Cooking with Amy, the Oyster Local blog or Gather.com, then the site where you found this post is illegally publishing copyrighted material.


Saturday, March 24, 2012


http://feedproxy.google.com/~r/SpanishRecipesinpictures/~3/mm-nxJbSuSQ/watermelon-and-tomatoe-gazpacho-shots.html
Red for Ferrari, for passion and for this gazpacho. There's only 3 minutes left for the big race...
Get the rest in my blog! See you there!
Get the rest in my blog! See you there!
Subscribe to:
Posts (Atom)